|
Terrarium/Fruiting Chamber tek
|
Mountain Mushroom FarmOrganic Shiitake MushroomsCertified Organic by Washington State Department of Agriculture 

Green Energy Farming Techniques - Research and DevelopmentIn early 2008, as ground was broken for what would become Mountain Mushroom Farm, the end-result was already well in sight. Marc R Keith, electrical engineer, Conservation District Board Supervisor, and lifetime organic gardener, wanted to put his design and development skills to work producing and testing the very latest ideas in green farming technology. With the addition of our new Biomass-Powered-Steam-Generator, Mountain Mushroom Farm is now operating 100% free of fossil fuels! Download Let's Grow Mushrooms, Only $8.99
Energy and Water Conservation in Mushroom FarmingAs anyone with knowledge of agriculture is painfully aware, some of the biggest users of water on the planet are irrigated farms. In most cases, this irrigation water must be pumped by mechanical means, thereby making these farms fossil-fuel, as well as water consumption intensive. Mushroom farming is no exception, but with the added caveat that gourmet mushrooms grow best in a cool, damp environment, which by traditional techniques in use today requires energy consuming heating and cooling systems. Mountain Mushroom Farm is an original test-bed for developing green energy and water-saving mushroom farming techniques. By placing the farm underground, geo-thermal conduction helps to maintain the appropriate temperature. This idea is not new by any means. Mushrooms have been grown in underground caverns in Europe for centuries. What we've developed here is a system to get fresh air in and stale air out with a minimum of electricity usage. In addition, contrary to popular belief, gourmet mushrooms such as Shiitake do not grow in the dark. Light is an important energy source for most mushrooms other than the common but tasteless 'white button' types commonly sold as the low-end mushroom in grocery stores. Passive Fresh Air SupplyWhat we've done differently at Mountain Mushroom Farm is to develop a passive fresh air exchange system, which uses the natural currents in the air above, coupled with the pressure and temperature differential below, to constantly supply and exhaust air through the underground growing chamber. On calm, cloudy days, we have a small fan of only 1/15 hp which assists these natural currents to always keep the air fresh and healthy below. In addition, we've pioneered the use of LED for mushroom growing, becoming the first commercial mushroom farm in the world to operate exclusively on LED lighting. These two developments alone have reduced electricity consumption by over 95%, when compared to similar sized conventional above-ground mushroom farms. Water ConservationMountain Mushroom Farm collects rain water and snow-melt runoff, and then stores it for later use, thereby reducing the electricity required to pump water from the well. This water is then used and re-used up to four times, before it is finally drained into the family's outdoor organic vegetable gardens. Substrate ColonizationAn additional consideration in mushroom farming is the colonization room. Mushroom substrates need to be allowed to colonize for two to four months at normal room temperature. Since an unregulated underground room will be at around 55F to 58F, the mushroom mycelium would be very slow to colonize the substrate. During construction of the farm, R-20 Styrofoam insulation was wrapped around the colonization area prior to back filling with soil, as shown in the pictures below. Since mushroom mycelium produces a small amount of heat as it colonizes(bio-degrades) the substrate, this 'free' heat is all that is needed to produce a perfect 75F in the colonization room, whether the temperature outdoors is 100F in the summer, or -30F as is common in the winter in this location. Spent Mushroom Substrates in Soil Conservation and Erosion ControlAfter growing Shiitake mushrooms on sterilized sawdust, the 'spent' substrates become the perfect soil conditioner. Mushroom farming mimics the natural processes that take place in the forest. When a tree falls in the forest during a wind storm for example, it is then consumed by various fungi, bacteria and insects, resulting in a return back to the soil to serve as 'fertilizer' for future trees and vegetation. Our spent mushroom substrates, consisting of mushroom mycelium and sawdust are placed in areas with high erosion, or in disturbed soils. They are then consumed by worms, birds, insects and a whole plethora of microbes. Within a year, they have been completely re-absorbed back into the soil and the results are astounding. Areas of dry sand and clay which had no vegetation, suddenly spring to life. Erosion in these areas is greatly reduced.
Spent Mushroom Substrates in the Amelioration of Fecal Coliform Bacteria.Many species of fungi consume and metabolize bacteria as a tasty meal. Oyster mushroom mycelium (P ostreatus) is especially voracious at devouring bacteria. In this remote section of Washington State, there are numerous areas where the early pioneer settlers had their 'outhouses'. 75 years later, this heavily contaminated foul soup is still seeping out of the ground and entering nearby creeks and other watersheds. The stench from this seepage is overwhelming, and the resulting algae bloom is threatening the fish and other wildlife. After just three years of placing some of our spent sawdust substrates into several areas of this seepage, the stench is completely gone, and there is only a small amount of algae that forms during the hottest months. This summer, in cooperation with the Ferry Conservation District, we will be documenting this success story with professional lab testing to demonstrate the amazing ability of fungi to clean up the environment, with an eye towards using spent mushroom substrates on a national level to prevent runoff from traditional farming and cattle ranches from polluting our streams, rivers and lakes. Below, please continue to read about our experimental farm, and enjoy the pictures taken during construction. We're now in full production, delivering fresh organic certified mushrooms to markets throughout the area. The following information has been archived here on the site for future reference. It will not be updated. Tragically, Vivian Keith, pictured on this page, had her life taken by cancer in 2014. She will forever be missed by all of us who loved her. 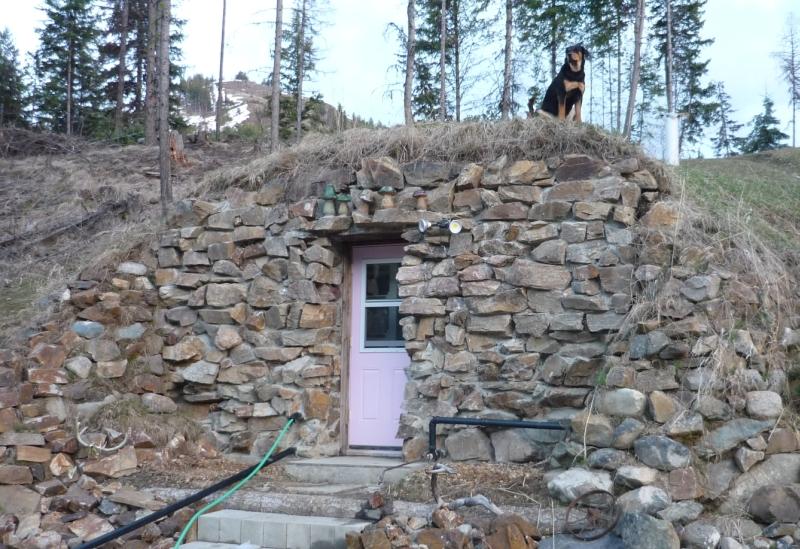 
May, 2011 update: 
Marc and Vivian Keith are proud to be taking Mountain Mushroom Farm into our second full year of production. From day one, we've followed the USDA organic standard in producing our Shiitake mushrooms in the northeast mountains of Washington State. Our construction materials and ventilation system were designed and selected with the organic certification standard in mind. For example, there are no pressure treated wood products anywhere on our farm, even though the standard only says it can't be in contact with the fruiting substrates. Our filtered ventilation system brings in fresh air 24/7, and doesn't supply any areas other than the under ground mushroom fruiting room, per the USDA organic mushroom standard. No trees are cut down for growing our mushrooms. The sawdust and bark on which we grow shiitake mushrooms comes from a local rancher and timberland owner who maintains his property organically. The sawdust being supplied to our Shiitake mushroom farm was previously a waste product of the thinning operations being performed to reduce forest fire danger here in the mountains of northeastern Washington State. Today, this waste material is being turned directly into food at the rate of one pound of sawdust to grow one pound of fresh mushrooms! We supplement our substrates with certified organic oat, wheat, or rice bran. Gypsum, a mineral, is also added to our substrates to increase calcium content, as well as to add sulfur, both of which are necessary for proper fruit development. We obtain our gypsum from Greenacres in Spokane, WA, which is on the USDA approved brand-name materials list for organic food production. Archive


We're located in northern Ferry County, which is in northeastern Washington State, USA. The fruiting area is designed to hold 500 substrate blocks. The colonization room will hold 2000 substrate blocks to account for the longer colonization time required. We have decided to exclusively grow organic Shiitake mushrooms for local markets, using locally produced sawdust and organic wheat straw. Below, you can follow the work we've done over the last year to get to this point. Compare the picture above, with the one below right, to see how much we've done in the last six weeks since the snow melted off in mid-April. We would have liked to get to this point last fall, but winter sets in hard and early here at our elevation in northeastern Washington State, and we simply ran out of outdoor working weather. Mushroom Farm Construction, Late Spring to Fall, 2009.Marc R Keith April, 2009 to November, 2009 

Click Images to View Full Size November, 2009 Wow! It was an awfully lot of work, but I'm really proud of how much Vivian and I got done this summer. With the exception of delivering the shipping container and the excavation work, the two of us did everything else. Our remote mountain location is inaccessible to concrete trucks, so we had to mix and pour everything by hand ourselves. That meant handling over 500 eighty pound bags of concrete and mortar mix. I ran out of construction weather when I had the rock wall you see above on the right almost complete. I need to get another two rows of rock put on top, but the cold and snow closed in well before thanksgiving, with temperatures dropping below zero in early November 2009.
That rock entrance wall is 24 inches thick and contains over 300 bags of concrete and/or mortar mix, plus more than 50,000 pounds of rock, collected from around and on our property. It's going to take my old body half the winter to recover from all that, but at least the facility is ready to grow mushrooms and we've started spawn generation. Mushroom Farm Construction, Day 1April 25, 2009 

Day one opened early. Just as Vivian and I were brewing our morning coffee, Mike Fagely, owner of Alpine Excavation of Republic, Washington showed up along with his crew, with and our shipping container on one truck and his excavator on another. No time for coffee now, we have to get to work! A few days earlier, I had gone to the location I purchased the shipping container from, with a good friend and neighbor, Norm Howe who has a really cool 1960 Ford flatbed truck with a gas powered welder on back. Norm is 76 years young, and always willing to offer a hand to help. With my cutting torch, I cut out the openings for the 12" schedule 40 vent pipes you see sticking out of the back end of the shipping container. Using Norm's welder, I welded the two stubs in place, sliding them inside the opening sufficient to weld them to the frame of the unit. I then welded all the way around the perimeter of the pipe, sealing the gap between the pipe and the sheet metal. This made it a snap when the time came to weld the 6 foot long sections of pipe in place. 
Each of those had to be extended once the burial started, but I was afraid to make them any longer due to weight, until we had a few feet of soil packed in around them. Day one ended about an hour after digging started when a late spring snow began to fall. It was two weeks before the snow melted and the ground dried out enough to resume excavation. Mushroom Farm Construction, Day 15Two weeks have passed and the ground is finally dry. The excavator digs out the opening down to a depth that puts the entrance about three feet(one meter) above the level of our back lawn. 

This is to allow for our abundant snowfall to come without burying our way in and out. The ground is then carefully graded to give a 2% slope from the back of the opening to the front. This is to allow for drains to be installed in the fruiting section which will drain the excess water out through the front of the unit and into our flower beds and lawn. Since this is just water from spraying the interior or soaking substrates, it isn't considered gray water and no treatment is required. 

Before the unit was set in place, I layered two sheets of Styrofoam insulation on the roof, which was then covered over with a one-piece hay tarp to keep water off the surface of the shipping container. Above the hay tarp, I laid sheets of OSB wafer board from one end to the other to prevent the rocks and soil being dumped on top from tearing the tarp as the unit is buried. 
To support the weight of the soil above until I could get a permanent load-bearing support structure built inside, I used trees that had been cut from the area before excavation, and built a temporary header out of 2 X 6 Dougas fir lumber. 
Considering the limitations of the temporary support, I instructed the excavator operator not to put more than 36" of soil on the roof. I had hoped to have my entrance retaining wall built by mid-summer, at which time he would come back to finish burying to original grade level, but as usual, everything takes twice as long when you're in a remote area like this(the nearest town with a Lowes or Home Depot is a three hour drive each way) and it just didn't happen. 

This is a shot just before stopping work until I could get a proper support system built. I'll have to get him back out here next summer to finish the work and restore the surface to original grade. We'll then get to work on landscaping, using our spent mushroom substrates along with our neighbor's llama manure as soil conditioner to build the soil up. The area will then become a 1 acre organic berry patch and flower garden for our honey bees. Mushroom Farm Construction, Days 15 - 60The Mushroom Fruiting Chamber
Now that the unit was in place and buried, the next order of business was to get a permanent support system to carry the loads imposed on the roof of the shipping container. I planned for the mushroom fruiting section to be at the rear of the container, so the support system had to be a material that was strong and wouldn't rot. I built the support trusses from 2" steel square tubing with a wall thickness of 1/4". They were bolted at the base of the unit directly through the hardwood floor to the steel beams below. Later, a concrete slab was poured, encasing

the base of the support trusses. You can see the six inch tall curb around the perimeter. This was poured before the slab, creating a concrete tank to catch water and drain it towards the front of the mushroom grow area where the floor drains carry it outside. This area is later going to be filled with rocks to provide humidity. I'll spray down the rocks and whole inside with a hose a few times daily. 

The shelves in the growing area are made from 1" angle iron. Every joint is welded all the way around to seal it from water entry which would lead to rust. For that reason, I burned almost fifty pounds of welding rod on these trusses and shelves, but I'll tell you what, they're strong enough for a 900 pound gorilla to swing on. The next order of business was construction of the dividing wall between the fruiting and the colonization rooms. I wanted a heavy wall with lots of thermal mass to resist temperature loss, and one that could be directly sprayed with water. The logical choice was concrete. I used concrete blocks to build the structure itself, and then placed left over scraps of angle iron from building the shelves into the voids to serve as rebar before pouring them solid with concrete, all the way to the top. 
After the wall was complete, I trawled stucco over the surface as can be seen from the picture below on the left from the colonization room side of the wall. Before building the wall, I put the door in place, and then built the concrete wall around it. Since I had already put up the studs for support in the colonization room, there would have been no way to install the door had I done it the conventional way. The door is an insulated steel unit with a double pane window that can be opened. It has a screen to help keep insects out during the summer months. Of course, the electrical conduit supplying power to the fruiting area had to be ran prior to building the concrete wall. Download Full Release-Let's Grow Mushrooms in High Resolution for only $8.99!
The Mushroom Substrate Colonization AreaThe supports for the colonization area were built from machine rated 2 X 4 lumber on 16" centers. The purlins for the shelves are screwed to the studs, providing shear strength. 

All wood materials were assembled with screws. There's not a nail in the mushroom farm anywhere. Of course, the original log supports were left in place for the first two weeks or so until I got the permanent support structure in place and ready to take the load. Once the concrete dividing wall was up, the next item on our list was to build the shelves in the colonization area to hold the filter patch bags of substrate as they colonize. As said previously above, purlins for the shelves were attached to the machine rated studs, 
giving support to the shelves, and shear strength to the studs holding the weight of the soil above. Being somewhat anal retentive about construction quality, every support for the shelves was adjusted to perfectly level before screwing into place. The purlins were placed along a chalk line I snapped to make sure they were perfectly straight. 
Vivian had the unenviable task of painting. All of the shelf supports had to be painted in place, but mercifully, I cut the wafer board to the correct size and placed it on concrete blocks so she could paint it outdoors with a roller. After the paint dried, we slid them into position and fastened them to the 2 x 2 supports. Mushroom Farm Construction, Days 61 - 120The Mushroom Cave EntranceMy plan from the start was to build a natural rock entrance and retaining wall. I wanted a 24" rock, concrete, and steel wall to have the physical strength to serve as a retaining wall to hold the hillside back, along with the thermal mass to resist temperature changes from our extreme mountain weather. 

It's not unusual to reach 105F in the summertime, while dropping to -30F in winter. Such a wall will weigh many tons and require a strong footing to set on. The ground was leveled off, and then packed down tight, sprayed with water and then packed down again a few days later. Once the ground was rock hard, the forms for the entrance footing and patio were built from 2 X 6 lumber. Steel reinforcing bars were first driven into the ground, protruding about six inches above what will be the finished level. These are for attaching the rest of the reinforcement steel to as well as securing the the steel mesh and rocks above, tying it all together. The concrete was poured and then allowed to cure for 30 days before beginning construction of the actual rock and concrete retaining and entrance wall. 


click picture for larger image Once the shelves had been built and the concrete entrance poured and curing, it was time to build the entrance wall. 2 X 6 lumber was used even though this isn't a load bearing wall, to enable the use of insulation rated to R-19. An insulated steel door with screened, double pane window vent was installed at the entrance. OSB wafer board was used as covering on each side, followed by a layer of roofing felt on the exterior as a moisture barrier. Once the roofing felt was in place, 2" Styrofoam insulation was placed over that, providing an additional R-10 before the concrete and rock wall was built over that. 

Many of the rocks you see are well over 100 pounds in weight. As a result, I could only lay one row of rock per day, or the weight of the rocks would push the mortar out from under them. I built the wall so the rocks were placed about six inches away from the Styrofoam insulation. Once the mortar for each row of rocks cured overnight, I filled in that six or so inches behind them with concrete the next day. Wire mesh was buried in the concrete for strength. 
 The steel door header was built from the same 2" steel square stock that supports the growing room. Two vertical lengths of square stock are buried 48" deep in the concrete, one on each side of the door. To each of these, a top bar was welded to form a T which holds the 6 feet long door header steel as shown. The top bar was welded at a 2% angle sloping down as shown in the picture to ensure any water

that gets through the rocks, drips away from the door, rather than channeled toward it. Progress continued on the wall during the last part of the summer and early fall, getting no more than about two rows per week finished due to bad weather. Finally in early November, 2009 the temperature dropped below zero and stayed there, halting all concrete work for the season. The snow soon followed. 


We're in the spawn generation cycle now. Hopefully by mid-summer 2010 we'll have our little mom-and-pop Shiitake mushroom farm up to speed, turning out several hundred pounds of mushrooms per week! Download Full Release-Let's Grow Mushrooms in High Resolution for only $8.99!
Mountain Mushroom Farm is USDA Certified Organic!_________________________________________
RR Video - 415 N Empire Creek Road - Malo, WA 99150 - USA _____________________________________________________________ Text, Images, and Videos on this website are copyrighted. These video clips may be freely distributed and posted elsewhere for non-commercial purposes, provided they're left in the original form and linked back to www.mushroomvideos.com |