Automated intake air control system.
In order to maintain a steady pressure in the steam boiler it's necessary to control precisely the heat produced by the wood burning fire. In this design, it's done by controlling the amount of air entering the combustion area. The system shown here works perfectly by using a sliding guillotine type door over the intake sleeve, controlled by an electric solenoid valve. I wanted to ensure this system would work for many years to come, so the entire intake door was made from 1" angle iron and 1/8" steel plate. The pictures are self-explanatory so I'll just put them in order below from left to right.


After construction was finished and the mortar cured, the final touches on the intake door needed to be made. A bracket to hold and adjust the solenoid valve had to be fabricated, as shown on the left.

In addition, stops had to be installed to adjust and control the resting or idle position, and the full open position, as shown in the same picture. Since the exact location of these stops and controls can't be known until after the boiler has been fired up and brought to full operating temperature, this part of the job has to wait until testing is complete. During testing, one must operate the intake air door by hand to find the appropriate amount of air required.
At the idle position, you must ensure the temperature of the fire will be slightly less than required to maintain boiler pressure. If it is left open too much, a runaway situation will occur, causing the overpressure dump solenoid to open, and if the dump solenoid can't get rid of the pressure fast enough, the mechanical pressure relief valve will open. If the idle position is closed too much, the solenoid will cycle the door too often, otherwise known as short-cycling. You'll notice from the picture above that adjustable stop bolts are used to make this adjustment. After testing, simply make the 'sweet spot' roughly the mid point in your adjustment bolts. This gives plenty of leeway to use the boiler during winter or summer as required.
Building the Firebox Door Penetration
The door and frame for your outdoor wood fired boiler should be industrial strength. You'll be using it in the dead of winter, often during arctic fronts or snow storms and you can't always count on having perfect control of every piece of firewood, or even yourself as you stand on ice, loading logs into the firebox while freezing your proverbial you-know-what off. If you drop a log or slip and fall onto the door which you eventually will do, you don't want it busting the door off its frame or bending it, burning the skin off your hands, etc.


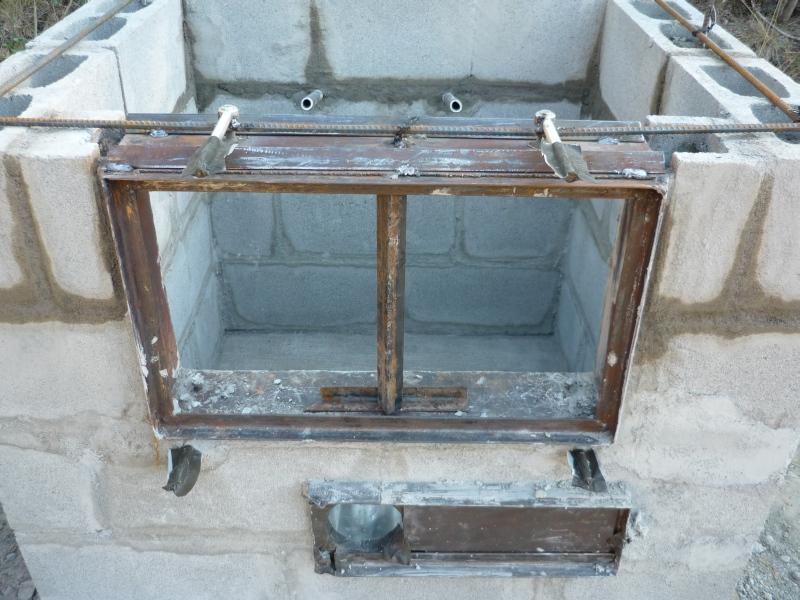
Since I planned to embed the steel frame for the door in concrete, I chose to fabricate it from 1/8" steel plate. If the steel were not to be fully encased in concrete, one should use 1/4" steel plate for rigidity and to prevent warping. The entire project was done with slightly over half of a 4'X 8' sheet. You want to make the door as large as practical, to make it easy to load the largest size logs the unit can handle. Having a large opening also comes in handy later when cleaning out the ash, or removing creosote from the interior.


Start building the boiler door frame by simply forming the outside perimeter with 1" angle iron, cut and mitered to fit, and then welded into a rectangle frame as shown. Always use a square to ensure your frame is going to fit the door later. Then, cut steel plate the width of your concrete blocks and weld these to the angle iron to make a solid frame. This ensures if you drop a piece of firewood while loading the boiler, it lands on steel plate and not your masonry work. It also gives plenty of contact area with the concrete and rebar system to which the frame should be welded as shown a paragraph or two above and to the right to make sure it never slips out of place, even after thousands of heat up and cool down cycles.
The door brackets which in this installation are simple gate hinges from the local hardware store, are welded into place before the frame is embedded into the structure with mortar. Be sure to get the face perfectly plumb and use blocks or lumber as shown to hold it firmly in place overnight as the mortar sets.
Building the Firebox Door
The door is also very simple to make. You just weld two pieces of 1/2" angle iron together as shown to frame the sides, and longer pieces for the top and bottom frame. Once placed side-by-side and welded, you just miter the corners with a chop saw and weld the frame together. The door frame needs to be 1" longer in width and height than the penetration frame. This will place the door gasket exactly in the center of the protruding door penetration frame for a good airtight seal.


Once you have your double angle iron frame built square and tested to make sure it fits perfectly, cut your steel plates for the interior and exterior door surfaces. The interior plate will be 1" smaller in dimension than the outer plate and should be welded into position first. Be sure after spot welding in a few places that you go back and weld it all the way around.


We're going to be filling the interior of the door up with vermiculite for insulation, and if it's not welded continuously around the edges, the steel plates will warp slightly and spill your vermiculite out. I found this out the hard way and had to go back later to make a continuous bead all the way around both inner and outer plates. Install the door gasket into the channel you formed


from the parallel angle iron. Build your door closing hardware and you're ready to attach the door. On the penetration frame, I simply used 3/8" fencing gate hinges for the studs, and for closing hardware I used a 3/8" nut welded to the end of a piece of 3/8" black iron pipe. Then, a short length of angle iron was welded to the iron pipe.
This was repeated four times for fully adjustable door closing hardware that can be tightened up as required as the gasket wears in. At first, my plan was to take the door off each time for loading and unloading firewood. However, the door is virtually bullet proof, and as you can imagine, heavy. I soon tired of lifting it off and back on each time I loaded firewood.

A pair of heavy chains was welded to the top of the door, and attached to brackets on the sides of the boiler, allowing the door to sort of hinge down and remain flat when open. This works out much better and also helps protect the air intake solenoid below from dropped logs, bark, ashes, etc., raining down on it.
For handles, I simply bent some rebar, slid them through holes I drilled through Dogwood tree limbs harvested from our property, made the final bend and welded them to the door.